

 10:31
10:31
 Unknown

Software requirements:
To develop applications of Android in eclipse , following are the Software requirements :- JDK full.
- Android SDK
- Eclipse JDE
- Eclipse ADT (Android development Tool) plugin.
Before opening eclipse , unzip and extract the files of JDK full and Android SDK . After these have been extracted now install eclipse . Eclipse will automatically access these plugins if installed on system . While initializing with Eclipse , you will be asked where you want to create workspace . Avoid creating your workspace in C.
To make a application for Android in eclipse we have three steps:
- Create an application project.
- Code the application.
- Run the application.
CREATE AN APPLICATION PROJECT :
After you unzip your android sdk kit , folder will appear in the disk wherever you have stored the extracted files . It will appear something like this :
Open this folder and the following icons should appear something like this:

Open the folder named Eclipse :


After you have chosen this workspace click OK .
Now main window of eclipse will appear on your screen .
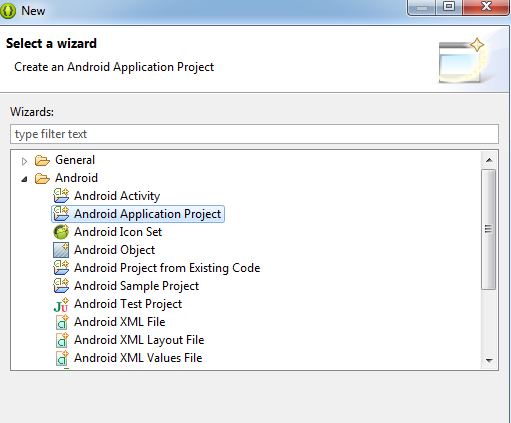
Click on File --- > New ---->Other
when you will click on other , following window will appear :
Minimize the welcome window and then the following window will appear . Check and analyse this window carefully :
it will appear something like this

Minimize this middle window and click on package src in HelloWorld and then select the main activity file .
With this we completed the first step i.e. to create the Application Project is now created .
With this we completed the first step i.e. to create the Application Project is now created .
Now we come to coding . How to code the first very basic program --> to print HelloWorld .
public class MainActivity extends Activity
{
public void onCreate(Bundle b)
{
super.onCreate(b);
TextView t=new TextView(this);
t.setText("Hello World");
set.Contentview(t);
}
}
After this we are done with the coding step also. Next is how to run this code .
In the package window , right click on the folder HelloWorld. Click on run as -----> Android application . Set the emulator .You can choose any device as per your wish and then launch the application . It may take few minutes even to display the virtual device with this application opened .
This how we can make a project and see how it runs .
.jpg)


0 comments:
Post a Comment