Thursday, 19 June 2014

STRING AND STRING BUFFER

STRING AND STRING BUFFER

String class is a immutable class . Immutable classes are those classes in which if we create object of that class and after that alter the content of that object then every time a new object is created that store the altered content 

String buffer class is mutable class . Mutable classes are those classes in which if we create object of that class and after that alter the content of that object that changes will occur in same object . No new object is created .

EXAMPLE :
String s = new String("Hello");
s=s+"World"; 

Understand that , a string s is created in line 1 in which initially we put "Hello" in string s . And in statement second we have concatenated string s . And add further "World " to this .
As this is a string class and string classes are immutable . Hence , world will not be stored in same object where hello was stored . A new object will be created every time we concatenate the string or add anything in the string.

Now , consider the following set code :

StringBuffer b = new StringBuffer("Hello");
b.append("World");

Here , in the first line , string buffer is declared and in the object Hello is stored . When second line is read , to add more contents to string s we use keyword append . It does not  create a new object. World is added  to the existing object which contains Hello . 

NOTE :
If content of string  changes rapidly then instead of String , String buffer is convenient and is suggested .

Methods in CLASS BUFFER:


Consider a String defined this way :

   String s="Hello World";

We have a list of methods :

  • s.length();
  • s.charAt(n);
  • s.toLowerCase();
  • s.toUpperCase();
  • s.indexOf('char');
  • s.lastIndexOf('char');
  • s.replace('x','y');
  • s.subString(x);
  • s.subString(x,y);
  • s.equals("xyz");
  • s.equalsIgnoreCase("xyz");


Understanding the above mentioned methods :

 s.length():
It will display out the characters used in the string . To print the number of characters on screen :
              System.out.println(s.length(););
And for above string s it would be 11 . Note that space is also considered to be a character.

s.charAt(n);

This methods gives the character present at nth position . Positions are considered by system in the following way :

Hello World
01234567891011
Hence ,
                            s.charAt(0) -- > H
                            s.charAt(1) -- > e
                            s.charAt(2) -- > l
                            s.charAt(3) -- > l
                            s.charAt(4) -- > 0
                            s.charAt(5) -- > ' '
                            s.charAt(6) -- > W
                            s.charAt(7) -- > o
                            s.charAt(8) -- > r
                            s.charAt(9) -- > l
                            s.charAt(10) -- > d


s.toLowerCase
This method changes the string s to Lower case i.e. all the characters in string s are changed to Lower case characters.

s.toUpperCase
This method changes all the characters of string s in Upper case characters i.e capital letters .

s.indexOf('l'):
This method gives the position or location of character l . Also in other words it is a kind of reverse of s.charAt method. 
Index of missing character is defined as -1.

s.replace('l','*');
It will replace the character l in the string with the character * . Generally .
In s.replace('x','y') , character x will be replaced by character y.

s.subString(6);
It will display all the character from position6 till the end of string . In other words , substring of characters from character 6 till end would be accessed.

s.subString(3,6);
If a single argument is passed through substring it will display the characters from 6 till end.In case of two arguments it will check from 3 to 6 .

s.equals("xyz");
It checks weather string in brackets i.e string xyz is same as string s or not . IT IS CASE SENSITIVE .

s.equalsIgnoreCase("xyz");
It is not case sensitive. This is only difference in s.equals and this method.

String s[] = s.split("x");
This method is used to split the string from character x.
If we split the string s from l , then:
   String s[]=s.split("l");
Four strings would be formed .

He
""               // an empty string as l appears two consecutive times
o Wor
d


Wednesday, 18 June 2014

STATIC KEYWORD AND FINAL KEYWORD

STATIC KEYWORD :


Consider the following program

     class Print
    {
static int a;
int b;
void get(int a,int b)
{
this.a=a;
this.b=b;

}

void op()
{
System.out.println(a+""+b);

}
public static void main(String args[])
{
Print p=new Print();
p.get(10,20);
Print p1 = new Print();
p1.get(30,40);
p.op();
p1.op();
}
    }

Static keyword is used in three ways :
  • Static Variable.
  • static Method.
  • Static Block.
STATIC VARIABLES : 
In static Variable , if we declare the value of any variable as static , the value of this variable remains same throughout the program and it takes in the value which is declared first via object . In other words , once assigned a value anywhere in the program it cannot be changed 

STATIC METHODS :

Static methods always contain static properties .
Consider the following program :

class Print
{
Static int a=10;
public static void main(String args[])
{
System.out.println(Print.a);
}
}

We can acess static variables and methods with class name only.

STATIC BLOCK :

Static block always run first even before the main method.

class Print
{
Static 
{
System.out.println("A");
}
public static void main(String args[])
{
System.out.println("B");
}
}

It will print A first and then will print B.

FINAL KEYWORDS :

Final keywords are of following types :
  • Final Variable
  • Final Method
  • Final Class

FINAL VARIABLE :

Consider the following set of codes :

 final int a=10;

The variable a is fixed now and remains same throughout the program . If you intend to change the value of  a Final variable ,compile time error is thrown by the compiler .
  
FINAL METHOD :

If we declare a method as final method , then we cannot override that method .

public class Base
{
    public       void m1() {...}
    public final void m2() {...}
 
    public static       void m3() {...}
    public static final void m4() {...}
}
 
public class Derived extends Base
{
    public void m1() {...}  // Ok, overriding Base#m1()
    public void m2() {...}  // forbidden
 
    public static void m3() {...}  // OK, hiding Base#m3()
    public static void m4() {...}  // forbidden
}

FINAL CLASS :

If we declare a class a final class , then we cannot inherit a class into other  class .
Example : System String are the classes declared final at back end .

NOTE :

If we declare a class 1 as final class then its method cannot be overridden in other class 2 because we cannot inherit class 1 in class 2>
Therefore no overridden .  

Tuesday, 17 June 2014

USING ECLIPSE

Software requirements:

To develop applications of Android in eclipse , following are the Software requirements :

  • JDK full.
  • Android SDK
  • Eclipse JDE
  • Eclipse ADT (Android development Tool) plugin.
Android SDK contains tool libraries, Emulator (AVD - Android Virtual Device ). Emulator provider platform to users to see how their application will appear on handset when installed . A virtual mobile appears on the screen. It will look like the actual screen of mobile handset we see. AVD also asks developer for which particular handset developer wants to appear on the screen .

Before opening eclipse , unzip and extract the files of JDK full and Android SDK . After these have been extracted now install eclipse . Eclipse will automatically access these plugins if installed on system  . While initializing with Eclipse , you will be asked where you want to create workspace . Avoid creating your workspace in C.

To make a application for Android in eclipse we have three steps:

  • Create an application project.
  • Code the application.
  • Run the application.

CREATE AN APPLICATION PROJECT :

After you unzip your android sdk kit , folder will appear in the disk wherever you have stored the extracted files . It will appear something like this :


Open this folder and the following icons should appear something like this:


Open the folder named Eclipse :
open the Application eclipse , with violet coloured icon and size of 312 KB. A window will appear on your screen and will ask you to choose workspace where you want to store data . Avoid choosing C drive .


After you have chosen this workspace click OK . 

Now main window of eclipse will appear on your screen .
Click on File --- > New ---->Other 
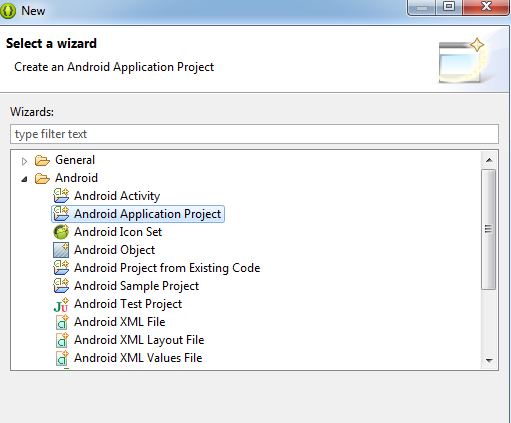
when you will click on other , following window will appear :
Select Android Application project . Eclipse will ask you to input Application name and project name . Note that while entering project name there should be no space in project as well as Application name .

Minimize the  welcome window and then the following window will appear . Check and analyse this window carefully :
it will appear something like this 


Minimize this middle window and click on package src in HelloWorld and then select the main activity file .
With this we completed the first step i.e. to create the Application Project is now created .

Now we come to coding . How to code the first very basic program  --> to print HelloWorld .

There is code available on your window > you can either edit that code or erase it and type the following . However editing it is a good option :


                  public class MainActivity extends Activity
                  {
                          public void onCreate(Bundle b)
                          {
                             super.onCreate(b);
                             TextView t=new TextView(this);
                             t.setText("Hello World");
                            set.Contentview(t);
                          }
                 }

After this we are done with the coding step also. Next is how to run this code .
In the package window , right click on the folder HelloWorld. Click on run as -----> Android application . Set the emulator .You can  choose any device as per your wish and then launch the application . It may take few minutes even to display the virtual device with this application opened .
This how we can make a project and see how it runs .

Monday, 16 June 2014

Trending OS based Mobile Phones

CELL PHONES VERSUS SMART PHONES :

In the 5 years we moved from cell phones to smart phones . Smart phones are user friendly, high at technology . Not only at software basis but huge improvements are observed at Hardware basis also . Fast processors , huge internal memory , access to external memory , touch screens , large screens , better cameras , sensors etc . make the mobile phones compete in market. 5 or more years back we mostly had mobile phoned which provided us with the facility to call and sms only . Those phones were black and white and today we have mobile phones that provide us huge set of applications , internet facilities and what not . Mobile phone have almost decreased the need for using desktops and laptops for small and daily use purposes . Laptops are these days used only for development purposes . Before moving on we will discuss current scenario of mobile phones . The software that provides platform of various applications are called operating systems . Mobiles phones in trend these days are OPERATING SYSTEM based . JAVA based mobile phones existed between black and white cell phones and smart phones. We will first take look at the top 3 in trend operating systems.
  • ANDROID OPERATING SYSTEM
  • IPHONES (iOS)
  • WINDOWS BASED MOBILES 
If we go to market to purchase a mobile phone , we first decide the operating system we want to use and then we set our budget . According to our budget , various companies provide various versions of hand sets . This is where mobile phone market is going .

As far as Android operating system is considered , it is a open source i.e. any user using a android mobile can make a android application and upload it in play store which provide android users the set of applications available for them . Hence android is user based operating system or we can user dependent .
There are many companies in the market which provide Android as operating system in their handset. A lot many companies , providing people a vast set of choices according to their budget and need .
However if we consider iOS or Windows based mobiles , these are not open sources . Apple is the providers of iOS software and is available in only iPHONES . Similarly Microsoft is the launcher of Windows phones and we can access windows operating system by having a NOKIA handset .
These are not open sources as they set limitations to users .
Hence the Operating System used at maximum level is Android Operating system.

For a developer to develop application for these operating systems following environments are used    :

  •  For Android  ECLIPSE is used .
  • For iPHONE
  • For windows mobile development VISUAL STUDIO is used.
Also for development , developers should have adequate knowledge of following programming languages .
  • For Android JAVA is the base language
  • iPhone applications are developed with OBJECTIVE C.
  • For windows based mobile application development .net (C#) is used .

Sunday, 15 June 2014

ACCESS SPECIFIERS

Access specifiers 

Access specifiers are used to declare that who can access the method and data members of a  class .

We have seen many programs till now and often keyword pubic was used .By using this keyword we declared the class or method to be public.

We have Four types of Access Specifiers :  

  • public
  • protected
  • default
  • private 


public :
If a class or method is public , it means the method can be accessed in the same class , as well as in other class in same package and in the class of other packages as well . Also can be accessed by the derived classes


protected  :
If a method or class is protected , it means that the method can be accessed by the classes of that package only to which the class itself belongs . And methods can be accessed by derived class can also be accessed .
If the class belongs to some other package and is not a derived class , it cannot access the methods of protected class .

default :
If we do not declare any access specifier , default case is considered . In this the method can be accessed by all the classes of that package to which the class itself belongs . Classes which belong to other package strictly cannot access the methods of default class in any condition.

private :
Methods of a private class can be accessed only in that class. Even classes of same package or derived classes cannot access the  methods of private class.


For better understanding , refer to the following example:
Let classes c1,c2,c3 belong to same  package A. And classes c4 and c5 belong to another package B.
Also assume that class c4 is inherited from class c1.

Now we consider class c1 , in this class let we have some methods .
If the we declare the class as public then the methods of this class can be accessed by class c1 , c2, c3 ,c4 as well as c5. that is all types of classes can access the methods of a public class .
If we declare the class c1 as protected , methods of class c1 can be accessed by c1, c2 ,c3 as well as c4 .Note that class c5 wont be able to access the methods of protected class c5 as it does not belong to same package . Note that class c4 is also not of same package but is inherited from class c1. Hence we come to conclusion that in case of protected class , the methods can be accessed by same package as the class belongs to or by the derived classes of that class .
 If we declare the class c1 as default class , then the methods of class c1 can be accessed by class c1,c2 and c3 only . Classes c4 and c5 wont be able to access the methods of class c1 as they do not belong to same package as the class c1 belongs to . In default, kit dosnt matter if the class is inherited by some other class of some other package .
If we declare the class c1 as private , then the methods of class c1 can be accessed only in class c1 . Classes of same package wont be able to access the methods of c1 here . Inherited classes are also not allowed to access the methods of a private class.

Saturday, 14 June 2014

INHERITANCE IN JAVA


INHERITANCE IN JAVA:

When one class called the derived class inherits the property of other class called the parent or base class is called Inheritance .

If class A is inherited from class B , it means that class A can access all the data members as well as methods of class  B and class A can also define its own data members and methods . Inherited class can have its own properties also in addition to the properties of parent class .

IN Object Oriented programming , Inheritance is of five types . C++ supports all these five types . However in JAVA Multiple inheritance is not supported .

We use keyword 'extends' to inherit  class  . 

Five types of Inheritance is :


We will explain these one by one .


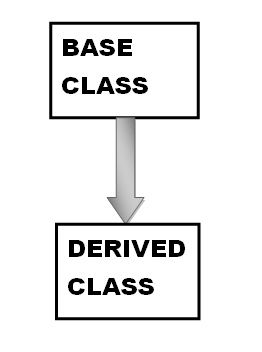
SINGLE INHERITANCE  

 When a single derived class is inherited from single base class , such type of inheritance is called single inheritance . There is one base class and only one derived class .


MULTILEVEL INHERITANCE

When another derived class is created from a Derived class such type of inheritance is called multilevel inheritance .


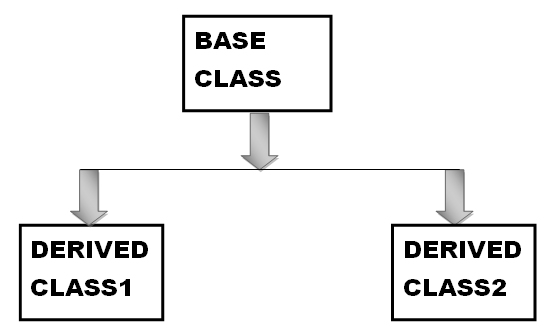
HIERARCHICAL INHERITANCE

In Hierarchical Inheritance , from one single base class , more than one derived classes are inherited .

That is more than one class inherits the properties of one base class .


MULTIPLE INHERITANCE

In multiple inheritance class , one derived class is inherited from two base classes . A single class inherits the methods and data members of two classes . 
 JAVA , does not support multiple Inheritance . Now the question arises :

Why multiple inheritance is not supported in JAVA ?

In multiple programming properties of classes are inherited by same class  . If both the base classes have a same function and we call this function in main , then which out of two function will be called ? Due to this ambiguity , multiple inheritance was removed by java Developers . In languages like C++ , this type of problem is solved by the concept of  Virtual functions which is not supported in JAVA . 

Note that even if both the bases classes do not have same function then also multiple inheritance is not possible in JAVA .


HYBRID INHERITANCE

Combination of above defined inheritances is called Hybrid inheritance . IN JAVA hybrid inheritance is possible but with a condition that there should be no multiple inheritance anywhere .


Friday, 13 June 2014

PACKAGES IN JAVA

CONCEPT OF PACKAGES:

 Packages is the collection of classes . Like in folder we handle files , hence for handling classes that belong to same category are kept in a single folder . This folder is called a PACKAGE . JAVA provides syntax for creating , as well ass accessing the classes of a package . We will see here how to create our own package and how to access a class for already existing package .

Packages remove the complexity . like folders provide organisation for files , in the similar way packages provide organisation of classes . packages make it easy to reach and search a file . Packages also provide the benefit of Data hiding .


INBUILT PACKAGES :


In-built packages are already available in java . A particular type of package contains classes with a similar property .
Understanding concept of packages is important as it is widely while preparing projects .
Some packages that  are inbuilt are  : 
java.lang
java.util
java.id
java.net
java.sql
java.awd
java.awd.event 
.
.
.
.
and many more .

Understanding how packages are written :

The format is  :

                                      a.b.c

Which means that package a contains another package b , and this statement would appera something like this 
                                      a.b

Now let b contains another package c .

that is .. a package contains another package b , b contains another package c
then if we want to refer package it is written like this :

             
                                a.b.c

Hence , java.awd.event means that we are referring  to package event which is contained by package awd and further awd package is contained by package JAVA 

Again note that packages are nothing but folder with collection of classes of similar category .

USER-DEFINED PACKAGES  :


We need to create packages while developing projects to avoid confusion and make it easy for us to access classes .

CREATING A PACKAGE :


Let us say we want to create a package com which further contains alpha 
And this package alpha we want to save our class for future use .

                         package com.alpha;
          // Defines that class will belong to package alpha is contained by com package 
                         
          public class Add
                      {
                   public  void sum(int a,int b)
                   {
                           int c = a+b;
                           System.out.println("Sum "+c);
                   }
         } 

Note that  Add class is declared as public here . To access a class of package it must be public . The methods of that class should also be public , only then they can be accessed out of package .

ANOTHER IMPORTANT POINT IN PACKAGES IS THAT ON A SAME NOTEPAD TWO PUBLIC CLASSES CANNOT BE CREATED FOR SINGLE PACKAGE.


TO ACCESS A PACKAGE : 

  • Only public classes of any package can be accessed.
  • Import statement is used to access a class of a package 
  • In JAVA multiple import statements are possible. That is we can access classes from different packages as many as required 
                    import com.alpha.*;
                    public class main
        {
             public static void main(String args[])
             {
                    Add a=new Add();
                    a.sum(10,20);
            }
        }

* keyword implies that we can access all classes of package alpha which is contained by package com.

How to access multiple packages :


EXAMPLE :

Create a package with name pack1 and add class Add .
Create another package pack2 and add a Mul class to it which will perform multiplication method . pack2 should also contain another package pack3 and add class Div which will perform division operation .  
And we have to access these three methods in same main class .

SOLUTION :

  • Create  a folder with name pack1.
  • In notepad create class Add and save it in folder pack1.
  • Note that it is important to run this class , only then it will  be accessed by other programs


  • Now for package, create another folder with name pack2 . Folder should not reside in any other folder .


  • Now as per the demand of question , we need another package pack3 in pack2 with Div class . Make a folder in pack2 with name pack3 . 


  • Now we have created the three package . Next task is to call the call the method of these classes lying in different folders in a single main class.


  • Lets check the output also :

OVERLOADING

OVERLOADING :

Using any entity in more than a single way in programming is called overloading . Overloading is possible in c++ as well as JAVA .

In general , every programming language provides  two types of overloading :

OPERATOR OVERLOADING :

Operator overloading is the criteria of using the same method name for different operations . An operator for different data types give output accordingly . Consider the following example :


In JAVA , operator overloading is not possible but it uses internal operator overloading .
It means that user cannot defined operator overloading , but for some cases operators are already overloaded in JAVA . They are already defined in in-built classes.

METHODS OVERLOADING :

In method overloading , more than one methods have same name but they are used for different purposes .
Name of methods is name but they perform different operations and are used in different situations .

Defining and declaring methods with same name :
In method overloading name is same but number of arguments or type of arguments must be different.

Note that method overloading does not depend upon return type of method.

A program to illustrate method overloading is given :


class Mover
{
int a,b;
double d,c ;


void get(int a)
{
this.a=a;
b=a;
}
void get(int a,int b)
{
this.a=a;
this.b=b;
}
int area()
{
return(a*b);
}

public static void main(String args[])
{
Mover obj = new Mover();
obj.get(10);
System.out.println("Area of square "+obj.area());
obj.get(15,30);
System.out.println("Area of rectangle "+obj.area());
}
}


The output of this program will appear like this :


INPUT FROM USER


TAKING INPUT FROM USER :

Like in C++  .  cout and cin commands were contained by library iostream.h 
And to use cin and cout commands in a program , we used to write :
            
                    #include <iostream.h>

In the similar way , for taking input from user in JAVA , Scanner class is used and this is contained in in-built package      util . 


We will see how scanner method is used :


                                      import java.util.*;
               class ScanDemo
               {
                     public static void main(String args[])
                     {
                          Scanner s = new Scanner(System.in);
                          // an object s of scanner class is                                  created
                           
                           System.out.println("Num1");
                           int a = s.nextInt();
                           System.out.println("Num2");
                           int b = s.nextInt();
                           System.out.println(a+b);
                     }
               }


nextInt is an inbuilt method in scanner class which takes integer as input . 

The input from user can be taken in form of character or string or can have any data type .

Like in C++ keyword #include was used to access the classes of any library , in JAVA keyword import is used for including any in-built class.

We will see later in PACKAGES how in-built classes are kept in packages and how to acces and create package  

To refer how to take other data types as input from user please refer :


Monday, 9 June 2014

Flow Controls in JAVA


CONDITIONAL STATEMENTS :


  •  IF STATEMENT :
                       SYNTAX :
                                            if (condition)
                                                  {
                                                   ------ ;
                                                    }
                                       
                   The IF loop lies in the curly braces . if the condition defined in brackets will be satisfied only then the statements in the curly braces will be executed else the compiler  will jump those statements.

e.g.
                          if (a>b)
                          {
                               System.out.println("a is greater than b");
                          }

ON the screen a is greater than will be printed only if a id greater than b .


  •  IF - ELSE STATEMENT :
                          SYNTAX :
                                           if (condition)
                                             {
                                                 -----;
                                              }
                                         else
                                         {
                                          ----;
                                          }
                                     
IN this kind of statement , if the condition is satisfied statements under if loop will be executed and in case the condition is not met it will jump the if statements and will execute the else part.

MULTIPLE IF ELSE STATEMENTS ARE POSSIBLE :
               
                            SYNTAX :
                                               if (condition_1)
                                              {
                                           
                                               }
                                               else
                                                {
                                                            if(condition_2)
                                                            {
                                                     
                                                            }
                                                             else
                                                             {
                                                                             if(condition_3)
                                                                             {

                                                                             }
                                                                              else
                                                                               {

                                                                               }
                                                              }
                                                }

  • SWITCH STATEMENTS :
                          SYNTAX :
                                         
                                               int n ;
                                               switch(n)
                                               {
                                                 case 1: {-----};
                                                  break;
                                                 case 2 : {-----};
                                                  break;
                                                  -
                                                  -
                                                 case n : {----};
                                                  break;
                                                 default : {};
                                                 }

In the above syntax , we consider any integer n . For n to be 1 , case 1 will be executed , for n to be 2 , vase 2 will be executed .In the same way for n case n will be executed . If the value or the integer is greater than n , then default case will be executed.

NOTE :


  • Instead of passing an integer value , character can also pe passed . In JAVA Version 7 and above we can even pass a string .
  • For character :

                                      char 'n';
                                      switch('n')
                                     {
                                       }


  •  Use of break statement is IMPORTANT . if the value of n is 1 and break statement is not used . All the cases following case 1 will be executed .  

LOOPING :


  • FOR LOOP:
                          SYNTAX :
                                               
               for(initialize any variable;condition;increment/decrement)
                                               {
                                                        ----- ; 
                                                }
 In this loop a variable is first initialized i.e. initial value to the variable is assigned for which the loop will be executed . When the compiler reaches the end of the loop , it increments/decrements the initialized variable as per the command given in third section and then after incrementing condition is checked . If the condition given in second section met even after the increment/decrement , the loop is continued .
In this way loop continues till the condition is satisfied . For any unwanted value of the variable , loop is broken .  

         for (int i = 0 ; i<5 ; i++)
        {
             System.out.println("THE VALUE IS "+i);
        }

The loop will execute till the condition is satisfied and the output of the above program will be :

THE VALUE IS 0
THE VALUE IS 1
THE VALUE IS 2
THE VALUE IS 3
THE VALUE IS 4


  • WHILE LOOP
                               SYNTAX :
                                        initalization ;
                                        while(condition)
                                          {
                                             ---- ;
                                            increment/decrement ;
                                         }

While loop and for loop are almost the same . For loops are used when the number of recursions are known and while loop is used when number of recursions are not known .

  Example : The same above program can be implemented using while loop in the following way .
                        int i ;
                        while(i<5)
                       {
                           System.out.println("THE VALUE IS "+i);
                            i++;
                       }


  • DO WHILE LOOP :
                                   SYNTAX :
                                         initialization ;
                                        do
                                         {
                                           ------ ;
                                            increment/decrement ;
                                          }
                                           while(condition);  
   
In do while loop condition is checked after the one time execution of loop . It works in the same sequence as it appears . The loop is one time executed for the initial value of variable and after the execution at the end it is incremented or decremented as per the requirements of the user . After this when the control comes out of the loop , if checks the condition for the current value of variable , if it holds the loop is again executed else control skips the loop.

BRANCHING STATEMENTS :

  • BREAK STATEMENT :
If we use break statement in a loop anywhere , the control comes out of that loop . NOTE THAT word loop is used here and if , if-else and switch statements should not be confused with loops .
If multiple loops are used then the control comes out of the inner loop .

This is explained with the example below :


The output of above program will be 0,1,2,3,4.


  • CONTINUE STATEMENTS :


The output to the above program will appear for 0,1,2,3,4,6,7,8,9.


IN JAVA THERE ARE NO GO TO STATEMENTS .

Twitter Delicious Facebook Digg Stumbleupon Favorites More

 
Design by Free WordPress Themes | Bloggerized by Lasantha - Premium Blogger Themes | coupon codes